TUBULAR TIPS
We have built up a list of tips that will help you enjoy racing on tubs, and help you to avoid the pitfalls...
1. Check your glue often
Don't risk an early DNF (or long run) by assuming that your tubs, which were good at the end of last season, are still good.
At least monthly and early in the week (so you have time to sort it before racing), let the air out out and give the sidewall a firm push to see if it is still glued to the rim. Check in several places and on both sides round the circumference. If your glue has gone brittle and the tyre comes away from the rim easily, it is time to pull them off and re-glue. 
2. "Quick" re-glue
If your glue has gone brittle you'll need to remove the tyre. It might come away easily, but it could be well stuck in places.
Work on a 15cm section well away from the valve (tubs tend to stay well stuck near the valve). Push the tyre towards the centre of the rim, you might need to carefully use an old knife to cut the glue, then push the tyre again.
Continue until you have fully detached the tyre in that section.
Carefully push a tyre lever (or something blunt and plastic) all the way through the detached section, then pull up to pull away another short section of tyre. Continue round the tyre in short sections until you all the way round.
Keep an eye for the join in the tub base tape, if you don't notice you could be leaving the base tape on the rim and giving your self an extra job to glue it back onto the tyre (this is most common on Dugast and FMB tubs).
Once the tyre is off, hopefully the glue on the rim isn't too lumpy. Go round the rim with a knife or edge of a metal ruler, carefully scraping the dry glue off the rim edges, this is important because this is where the glue fails first.
Once you have the worst of the lumps of the edges, give the rim a wipe with a clean rag soaked in Acetone. Hopefully you shouldn't need to clean all of the glue off, but this will make it tacky again ready for some more coats.
Go round the tyre base tape, pull off the worst lumps, then also wipe with Acetone.
If there are no (or very small) sections of the rim or tyre base tape without glue, you will be able to do a coat of glue on each, leave them to dry for 24 hours then re-mount the tyre. If there are sections without glue on either, you will need to do 2 coats on the rim and 2 on the tyre, leaving 24 hours between.
It is best to use the same brand/type of glue as is already on the rim/tyre. (We choose Continental glue, and do not use their carbon glue for carbon disc rims. Carbon rim brake rims heat up so the carbon glue is heat resistant formula and doesn't glue CX tubs so well.)
Get started with some coats of glue, make sure you paint the glue on all the way to the edges of the rim and the tyre base tape. Paint it on thin, thick coats are not stronger and will mean that you'll be more likely to need to fully clean the rim next time. This is a job to avoid where ever possible and is the difference between a "quick" re-glue and a "horrible time consuming" re-glue!
To glue the tyre, put enough air in so that it holds its shape and it begins to go inside out. Hold it as in the photo below. Whist you let the glue dry, let some air out so it is no longer inside out, this makes it easier to when you come to re-mount it and are trying to get it straight.

3. Mounting your tubs (this is the same process for new tyres)
(For clean/new rims/tubs we advise 4 thin coats on the rim and 2 thin coats on the base tape, with 24 hours between coats and after the final coats before mounting)
Give yourself about 20-30 minutes without interruptions, per wheel, to mount your tubs. Once you start a wheel you need work until the process is finished.
Before you start, make sure you know which direction the tread goes, most tubs don't have it marked on the side like a tubeless or clincher. Make sure that if you need a valve extender, you have it fitted already.
A general rule of thumb is that the point of chevron > shaped tread should point forward and for Challenge tyres, the tail of the Y shaped side tread should face forward.
Start by pumping the tyre up so it goes inside out. It is a good idea to twist the tyre so it goes tape out the other way than the last coat dried (if you need a valve extender fit it now).
Do a coat of glue on the tyre, as per the other coats put it on thinly, covering all of the base tape.
Next, put a coat of glue on the rim, this time you can be a bit more generous, but don't go too thick, again go right to the edge of the rim.
Now crack on and get ready to mount the tyre, you don't need to let the rim layer dry.
Give your hands a clean so that you start clean.
Double check the tread direction and that you have the wheel the correct way round.
You are aiming to to get the tyre on straight so there is minimum side to side wobble (like a buckled rim would wobble) and the tread rotated so the tread is central to the rim (otherwise you’ll have more/less side tread on one side).

Let the tyre down so that it just holds its shape. Hold the wheel with the valve hole at 12 o'clock with one hand and place the tyre valve through the valve hole with the other. Now stick the tyre so it seats centrally to the rim for approx 10cm each side of the valve.

Place the wheel/tyre on the ground with the valve at 6 o'clock. I take my shoes off and use my toes to hold the wheel to the floor, whilst pulling the tyre up along both sides of the rim with even tension. Stick it on as straight as possible working in 5-10 cm sections until you are left with a tight section opposite the valve.

The last part will be quite tight to get in place, but having glued the tyre first it shouldn't be too messy. Pull it up and on to the top of the rim, do your best to stick the last part on as straight as possible.

Take a look round the wheel, lift the tyre away from the rim and straighten it where it is obviously out of line. Next pump the tyre up to its maximum tyre pressure, this will pull the tyre pretty straight.
Give the wheel a spin and look along the tread, you need to check that the tyre tread is central and not significantly rotated.
You are likely to need to work round the wheel a few times to get it central. Working quickly, grab the tyre and twist to rotate it, again working in small sections. I find rotating the tyre away from me works best.

Spend some time on this, you have a few minutes and can make several adjustments if you need to, Spin the wheel and look along the tread each time.
(Letting the tub down so not inside out while the first 2 coats dry helps this part of the process. Do not rely on using the base tape as reference for the tread to be central, it is often not stitched/glued on to the tub evenly.)
Some non-straightness is ok, you are unlikely to get it perfect. You'll often see a bump at the valve and base tape join and there can be some manufacturing variations in the tyre itself, particularly noticeable with Dugast and FMB. Since one of the main benefits of tubs is lower tyre pressure, you'll not notice these when riding.
Once the tyre is straight and tread central, let the tyre down completely. Go round the tyre pressing down hard with your thumbs, pushing the tyre down into the the U of the rim. Some people roll the tyre along a broom handle as an alternative.
Now re-inflate the tyre to 60/70psi and roll the wheel pressing down hard against the floor in short sections, to press the tyre firmly onto the rim.
Give the wheel a final spin to check you are happy, all being well pat yourself on the back for a job well done! You still have some time for last adjustments, but if so you will need to re-do the last two stages.
Finally, use an acetone soaked cloth to remove any glue from the side of the rim and gently from the tyre sidewall, and you are done.
Leave it to dry indoors for 24hrs and you can ride it!
Now, read this a few times so that it makes sense before starting.


Photos showing typical tyre tread direction (up being forward) and you'll notice how the tread is centrally aligned and not rotated left or right.
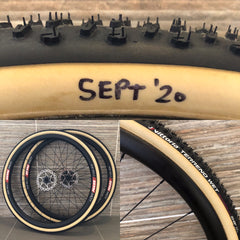
4. The date & initials
Using a Sharpe pen, we write the date that our tubs were glued on to the tyre sidewall - it helps us to know when to start thinking about when to re-glue and to see track if a different glueing process has worked.
There are quite a few LOWMASS wheels with the same tyres glued in the pits these days so to avoid mix ups we write our initials on the sidewall too.
5. Leave a stuck tub stuck
Do not pull a well stuck tub off unless you have to. Getting it off is really difficult and is likely to damage the tyre.
I glued some Tufo Primus tubs on specially for Battle in the Bowl, they were perfect. They are seriously tough tyres, and I ran them with sealant in too - brilliant.

But I took them off less than 5 days after to put some Dugast Small Bird on for Newbury Summer Cross.
I delaminated the skin on my thumbs in the process...
If it is stuck - leave it stuck!

6. Look after your tubs and your tubs will look after you
Tubs made with sealed fabric sidewalls offer the by far the best grip for cyclo cross, but grip can come at a price - durability...
Cotton sidewall are superb to ride and offer noticeable performance benefits, but being a natural fibre can rot if not looked after properly.
FMB, Dugast, Vittoria and Challenge Team Edition tubs all are made of cotton, where as Challenge Pro (yellow sidewalls) are made of polyester so don't suffer from rot.
So to start with you have a choice, go for cotton or go for polyester...
The polyester Challenge Pro is the best option for those willing to forgo a little suppleness in the name of longer life and in truth most people would have to ride them back to back with cotton to notice a difference.
If you like the Challenge treads - this is a very sensible option.
However, if you (like me) prefer a Supermud tread to Limus or a Small Bird to a Chicane, then figuring out how to look after cotton sidewalls is important.
Besides the fabric, there is another important difference in the construction of tubs. They fall into two groups;
1. FMB & Dugast
2. Challenge (Team Edition and Pro) & Vittoria (Update - Vittoria have discontinued making CX tubs so availability will diminish quickly)
FMB and Dugast have an extra layer of sidewall fabric under and slightly wider than the base tape.

The extra layer of fabric adds some extra cushioning and reduces the chances of pinch punctures, but the edge of the fabric is a weakness.
Impacts from riding with low pressure puncture the waterproof sidewall coating (particularly at the edge of the extra layer), and regular jet washing just adds to the problem.
Once the cotton is wet it needs to dry to prevent rotting. Week in week out Supermud conditions like those of 19/20 season meant that they spent a lot of time either wet or drying!
Something few people talk about is that cotton stretches when wet, we have seen some problems with soaked cotton tyre carcasses where tyres were brought indoors to dry. The temperature increase coming inside from cold January outdoors to warm centrally heated house increases the tyre pressure, and if the cotton is soaked and stretchy, the tread can detach...!!!
The solution is simple, deflate a cotton tubular before bringing it indoors.
Challenge and Vittoria's cotton tubulars, with no extra layer of fabric edge, don't suffer such obvious damage to the waterproof coating. We more often see the base tape detaching from the sidewall on them through...
We do experience / observe more pinch punctures without the extra layer under the base tape on Challenge tubs compared to Dugast or FMB. So as always - there is a balance between the durability of Challenge and performance of Dugast and FBM.


We use two products for protecting and repairing tubular sidewalls;
1 - Gear Aid Seam Grip +TF - This is a thin polyurethane sealant.
2 - Mcnett Aquasure - This is a thick, sticky paste like urethane sealant.
Once upon a time, you had to seal cotton tubulars as part of the fitting process and Aquasure was the go to product. It has a thick sticky consistency so is spread rather than painted on. These days tubs come ready sealed (thankfully), so we less often see tubs with lumpy self coated sidewalls.
With its thicker consistency, Aquasure is great for sidewall coating repairs. We use it on tubs which have seen a bit of action, to get some more life out of them. But you don't need to paste it on the the whole sidewall, we paint it over the more fragile edge of the extra layer on FMB & Dugast. You can only do this one or two times before it gets lumpy so we looked for something thinner to use more regularly.
We use Gear Aid Seam Grip +TF to coat the whole of the sidewall, its thinner consistency adds a little more durability to new tyres and keeps them looking fresh for longer. Over the life of the tyre, you can do several coats to repair the waterproofing without it getting lumpy or reducing suppleness.
(We also coat the sidewalls of Challenge Open Tubulars, this is more for the aesthetic of nice clean sidewalks for longer.)
More important though is that it completes the sealing of the base tape (especially important on tubs with raw cotton base tape - you guessed it - FMB & Dugast).
We always cover all the way to the edge of the base tape with tub glue during the gluing process, but an extra coat of Seam Grip +TF does a really good job of soaking in to the base tape. This is important because the base tape is another way that water can find its way into the tyre.
To do minor repairs on detached tread or base tape which is peeling away from the carcass, we use Evostick Impact - Instant Contact Adhesive to stick it back on, we've had better results with Evostick than tub glue. Then either Auqasure or Seam Grip (dependent on how damaged the sidewall coating is) to seal the area.
Prevention is better than than the cure...
For when are able to have pits and jet washing again; overzealous 3000 psi jet washing with the lance only centimetres away from the sidewall, is a surefire way to reduce the life of your tubs. I would avoid complaining (this is a surefire way to upset your team mates), but a team chat about being nice to our kit is a good idea.
7. TAPE...?
Fitting your tubs without the time, effort, fumes and space needed for several layers of glue is a compelling option and there is a product which claims to be the solution;

Effetto Mariposa Carogna tape has a double sided tape like surface to stick to the rim and a 1mm thick, high viscosity pressure activated waterproof glue on the tyre side.
It is super convenient to fit (so long as you don't break the liner tape when pulling from under the tyre) and claims that you can re-glue a tub which has the thick glue stuck to the base tape.
There is a catch...
The only tubs we've rolled were tubs fixed with Carogna tape.
We gave it a really good testing when it first came out and whether not sticking to the tyre or not sticking to the rim, we experienced a lot of problems.
However, they have since added a tyre primer which probably improves the adhesion to the tyre. And with wider carbon rims, LOWMASS Carbon Tubulars wider than most at 28mm, there is more surface to work with than the narrow rims we had back then.
We are following a few LOWMASS customers who are running it (hopefully without future issues) and are open minded to change our minds.
But until then, would you race on a glue that you know didn't work for you?
Our advice is simple - do not use Carogna tape...
Update - re-fitting a set of tubs which were previously stuck with Carogna tape is very difficult, the glue on the tyre catches on the edge of the tape on the rim and the backing tape snaps easily as you pull it out - total nightmare!
With some more time passed, we are happy with Carogna tape, so long as you are using carbon rims, and don't mind not being able to refit the tub you used it with...

You may have heard of FMB's CX TAPE, it is (was) a thick double sided tape used with the "Belgian method" of gluing, where a layer of tape is used under the last layer of glue before the tyre is fitted, a super strong and long lasting bond is achieved.
This tape reacted with the tubular glue, forming a super strong sticky layer which moulds to fill any gaps/voids between the rim and the tyre.
If you wanted the longest lasting, most reliable glue job this was the method to go for.
But there is a catch... it has been discontinued.
8. Loads of wheels...

Having several pairs of wheels with sand, intermediate and mud tubs glued is the pro way of going about things, but what if you are limited to a budget?
The first rule of tubs is - if you can have one pair of tubs make it muds.
The benefits of tubs are significantly multiplied when it gets muddy, the extra grip will mean you'll be able to ride where previously on clinchers or tubeless you could not.
The second rule of tubs is - If you have two bikes and can have two pairs of tubs make them muds.
Having the same grip on each bike is a huge plus in the mud. Avoiding the negative thought of "I don't like this bike" is helpful whilst the other is in the the pits being washed.
What about tubs in the dry? The main benefit of tubs in the dry is their lighter weight (a tub rim can be 3/4 of the weight of a light tubeless rim) and tub specific tread options (the Dugast Small Bird is awesome), but we would always recommend spending money on mud tubs before tubs for the dry.
What if you are able to buy three tub wheelsets for two bikes?
In this case go for two with muds and one intermediate. When starting on the intermediate set, if you need your spare bike during an early season fast dry race, the chances are it is all going wrong and you'll be in damage limitation mode anyhow - having muds on your second bike will be the least of your problems... And a Supermud with a few extra psi rolls surprisingly well in the dry too.
It is possible to change tubs during the season, there is good advice on this in The Cyclocross Bible, but we prefer to stick to our tip of leaving a stuck tub stuck, so don't do this often.
Take a look at our other articles - https://cyclocrossracer.co.uk/blogs/cyclo-cross-racer-ideas-reviews-and-advice
For more information about LOWMASS Tubular wheelsets head to - https://cyclocrossracer.co.uk/collections/lowmass